
![]()
![]()
This page provides information and Free Software specific to the Lowrance & Eagle range of GPS receivers and more particularly for the Lowrance GlobalNav 200,212 and the Eagle Explorer and Expedition.
These can be obtained direct from www.lowrance.com by following the links on thepage
The protocols neglected to give the conversions from Lat/Long to Mercator Meters.
These are the conversions direct from OziExplorer in Delphi (PASCAL) source code
Constants needed
RADtoDEG = 57.295779513082322;
EarthRad = 6356752.3142;
Convert Latitude in degrees to Mercator meters
function LatDegtoMM(d:double):longint;
var temp:double;
begin
temp:=d / RADtoDEG;
temp:=tan((temp+(pi/2)) / 2);
temp:=ln(temp);
result:=trunc(temp * EarthRad);
end;
Convert Mercator meters to Latitude Degrees
function LatMMtoDeg(m:longint):double;
var temp:double;
begin
temp:=m / EarthRad;
temp:=exp(temp);
temp:=(2 * arctan(temp)) - (Pi/2);
result:=temp * RADtoDEG;
end;
Convert Longitude in degrees to Mercator Meters
function LongDegtoMM(d:double):longint;
begin
result:=round(d / RADtoDEG * EarthRad);
end;
Convert Mercator Meters to Longitude degrees
function LongMMtoDeg(m:longint):double;
begin
result:=m / EarthRad * RADtoDEG;
end;
Following is a list of undocumented key combinations.
![]() To perform a reset
of the GPS do the following:
To perform a reset
of the GPS do the following:
CAUTION - this operation will remove all stored information (Waypoints,Events etc) from the GPS so do not do it unless you have to.
Some people who have done this operation report that all their data was still intact,
maybe just lucky, so still beware.
![]() To open up the
Diagnostic menu
To open up the
Diagnostic menu
CAUTION - DO not select the FINAL SETUP option this option will without warning remove all stored information (Waypoints,Events etc) from the GPS - similar to the reset.
The self test option will always indicate an ERROR 1 on PORT 2. To test
this port I think you need to provide a loopback of the transmit and receive pins on the
serial cable, joining pins 2 to 3 on the DB25 or DB9 serial plug (with the GPS turned off)
and then turning on the GPS and doing the self test produces an Error 0 which I assume is
a pass.
WARNING : the Communication Baud rate is reset to 4800 after
entering the Diagnostic menu - you do not have to use any of the options - there may be
other settings which are altered also, so check all your vital settings after entering
this screen.
![]() To open up the
Satellite information screen
To open up the
Satellite information screen
Go to the Group O screen (satellite display)
Press the DOWN arrow key 5 times
A screen of satellite information will be displayed (it looks better when tracking satellites)
![]() To
open up some sort of Elapsed time screen
To
open up some sort of Elapsed time screen
![]()
Making a Connector
This gives details of 1 possible method of making a connector to fit the GlobalNav 200 & Eagle Explorer
To make my connector I used a 6 pin "DIN" connector which are readily available in Australia and I assume the rest of the world. They are usually used in the Hi-Fi industry. As an example the keyboard connector for PCs is a "5" pin DIN connector, so you need to look for a connector which is similar.
The 6 pin DIN connector has the pins in the correct layout and spacing but
needs the following modifications:
The diameter is a fraction too large to fit in to the recess in the GPS so the diameter must be reduced. My connector was made of a hard plastic and I could use a normal engineering file to remove the excess material to reduce the diameter.
A flat must also be filed on the connector to match the flat in the GPS, there is already a groove in the connector which makes this easy. Keep working until you have the plug fitting snugly into the GPS socket.
The pins for a DIN plug are larger than those on the GPS so you must use a piece of wire (a straightened paper clip does the job) to press together the pin contacts inside the plug so they will press firmly onto the pins in the GPS when the connector is inserted.
When assembling the plug the metal frame which goes around the plug should be soldered together for strength.
The plastic outer cover which goes over the connector must be cut back severely so the connector can be inserted. Cut it back at an angle to match the slope on the GPS.
I have been using this type of connector to power my GPS and connect to a computer and have had no problems.
One person indicated he could not obtain a 6 pin DIN connector (which are less common) so used a 5 pin connector and drilled out the hole for the center pin.
Connector Pinouts
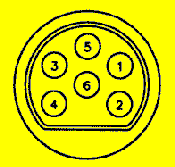 |
Looking at the Explorer from the back you see a connector as shown below. PIN DESIGNATIONS
|
Wiring the Connector for Communication with a PC
| GPS Connector | Connect to |
9 Pin Serial | 25 Pin Serial | ----------- |
| Ground pin 3 | -------------> | 5 |
7 |
Ground |
| Receive Data pin 2 | -------------> | 3 |
2 |
Transmit |
| Transmit Data pin 4 | -------------> | 2 |
3 |
Receive |
Powering a Eagle Explorer from a Car Battery
The Explorer requires from 5 to 16 volts for external power. A car battery when the motor is running is typically at 14.4 volts which is getting close to the limit of 16 volts. With spikes the voltage may exceed the 16 volt limit. Not knowing how the Explorer power supply is constructed I would recommend using a voltage regulator in the line.
The circuit needed is very similar to the circuit described below for the Charging circuit with the following changes.
1. Remove resistor R1
2. Connect the output of the circuit to Pin 1 on the GPS (instead of Pin 6)
It is possible to build this circuit small enough so that it can be located in the power line and covered with heat shrink tubing.
The Lowrance GlobalNav 200 power supply is much better than the Explorer but I still use a voltage regulator in the power supply as a safety precaution.
If you have any questions please email me.
Always double check the voltage and polarity of the outputs before connecting to the GPS.
Using and Charging Nicad or NiMh batteries
It is possible to use either Nicad or NiMh batteries (AA size) in the Explorer or GlobalNav 200 and charge these batteries while they remain in the GPS. Below are details of one method.
Charging Circuit
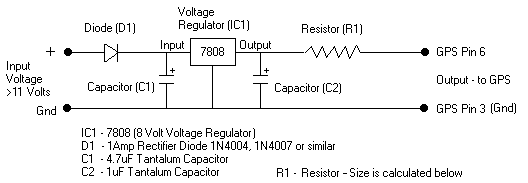
Diode (D1) is there to protect against connecting the power back-to-front.
The 7808 voltage regulator is not really required but I do not like to connect unregulated voltage to expensive instruments. A 7809 (9 volt) regulator could also be used. If you cannot get a 7808 or 7809 a LM317 could be used, by using 2 resistors the voltage can be adjusted to any value. A 7805 (5 volt) or 7806 (6 volt) cannot be used as the voltage is too low to charge the batteries. A 7812 (12 volt) cannot be used as its voltage is too high to operate from a 12 volt supply.
To power the circuit you could use a 12 volt DC plug pack (the type that you plug into the AC voltage of your house and typically used for powering small appliances such as walkmans etc). Note you must use a DC plug pack not AC. It should also have a capacitor filter built in (which they usually do), the only ones you should be wary of are those used for charging batteries which may have an unfiltered DC output which is not suitable for this circuit. You can also use the battery power from your car as well.
The capacitors (C1 and C2) are used to filter the voltage.
The resistor (R1) is required to set the charging current to a level suitable for the particular type of battery and its size must be calculated as detailed below.
using the formula V = I x R
we can rearrange this to R = V / I
where
For the example,using the above equation, the value of Resistor (R1) = V / I =
2.4 / 0.072 = 33 ohms
Adjust the values to suit you batteries.
Resistors come in only selected sizes so you must choose the available size closest to
your calculated value.
The other factor which must be considered is the power rating of the charging resistor
(R1).
Using the formula P = I x I x R = 0.072 x 0.072 x 33 = 0.17 Watts
The nearest power rating available for resistors which is above this value is a quarter
watt (0.25), so this is what is used.
How long to charge the batteries. If you are charging at 10% of the batteries capacity you need to charge for 14 hours (assuming the batteries are flat). The 14 hour figure is derived using a factor of 1.4 which is to allow for loses in the charging system (such as internal resistance of the batteries causing them to heat up). So if charging at 10% of the capacity the time needed is 10 x 1.4 = 14 hours.
Warnings
This charger is not for externally powering the GPS, it is for charging the Nicads. It does not supply sufficient current (amps) to power the GPS. Do not connect the charger to the GPS unless the Nicads are installed, and even though it should not cause problems, it is not recommended to have the GPS turned on while charging the Nicads (in fact they will not charge as there is not enough current to run the GPS and charge the Nicads as stated above).
This circuit has been tested with the Lowrance GlobalNav 200 so should also work with the Eagle Explorer. I do not know if it will work for other Lowrance or Eagle units.
If you decide to use this charging circuit you do so at your own risk. Incorrect wiring could damage the GPS so use a multimeter and test all parts of the circuit, and double check everything.
When using Nicads or NiMh batteries to power the GPS the voltage reading displayed on the GPS will not show the true battery level as it has been calibrated for Alkaline batteries. A fully charged set of Nicads will show a level just below the 3/4 mark, but this will quickly drop to the 1/2 mark and then gradually drop as the battery capacity is used.
The Antenna Connector
The Antenna connector for the GlobalNav 200 is an SMB connector or more correctly an SMB Jack.
Making an External Antenna
The GlobalNav 200 can have an external antenna fitted. Requiring a cheap solution I constructed the W1GE PATCH ANTENNA from information I obtained from Peter Bennetts GPS page. I have included this information below so it is easy to find.
Description of antenna construction
The dimensions of the patch are critical so construct as close to the specified dimensions as you are able. The dimensions of the ground plane are not as critical.
The changes I made were as follows :
Sheet brass was used instead of aluminium - you can solder directly to the brass. The brass sheet is available in various thicknesses, select a thickness which will have enough rigidity to maintain its shape when working with it. The brass sheet is usually available from hobby stores. The sheet I used was not wide enough for the ground plane but by soldering on an offcut it was OK.
To achieve the 5mm separation of the patch from the ground plane I used plastic tubing cut to 5mm lengths.
Notes
Use RG58C/U cable to attach the antenna to the SMB connector. The SMB connector is not designed for use with RG58 cable (it is for use with much smaller diameter cable) but by not using some of the internal pieces of the connector and soldering the shield of the cable to the outside of the connector it is possible to get a very neat join. RG58C/U cable is preferred because it is more readily available, less expensive and has lower loss than many of the thinner cables. To minimize the loss of signal keep the length of the cable as short as possible.
Observations
The antenna is very directional and is most sensitive in the vertical direction (assuming it is sitting flat). It will not easily pick up satellites close to the horizon. When connected to the GPS both antennas appear to still function. Where the external antenna is most useful is in the forest where the only clear view of the sky is straight up and this is the direction where it is most sensitive anyway.
The type of country where I most often use my GPS is tall timbered forest through to tropical rainforest. Sometimes there is no clear view of the sky as the tree canopy joins together above the road, without the external antenna mounted on the roof of the car (or sometimes just sitting on the dashboard) the GPS would not be able to keep a fix when mounted in a suitable location for viewing. Even with the external antenna a fix cannot be held 100% of the time, but the periods when the fix is lost are usually short.
I have found this antenna works well (within its limitations) and if you need the GPS to be able to keep a fix under extremely poor conditions it is well worth the effort needed to construct it.
I have tried to construct a cheap amplifier for the antenna to boost the signal strength but have not been successful so far.
Features which make the GlobalNav 200 & Eagle Explorer my Choice for a GPS
 |
|
| Simulation of GPS screen showing Events & Waypoints loaded. |
The GlobalNav 200 and Eagle Explorer with version 1.4 of their firmware have a bug which can occur when manually entering waypoints.
The release of firmware version 1.8 has removed the bug.
![]() The
Effect - When this bug occurs the GPS will turn
itself off. In some cases it will turn back on with no problems. In other cases it will
turn back on but not let you go past the "DO NOT RELY ON THIS PRODUCT AS YOUR PRIMARY
SOURCE OF NAVIGATION" page, and will turn itself off again.
The
Effect - When this bug occurs the GPS will turn
itself off. In some cases it will turn back on with no problems. In other cases it will
turn back on but not let you go past the "DO NOT RELY ON THIS PRODUCT AS YOUR PRIMARY
SOURCE OF NAVIGATION" page, and will turn itself off again.
![]() The Fix -
The fix is to reset the GPS using the MODE & POWER keys as described in the secret
keys section above. Unfortunately this will remove all waypoints & events from memory.
The Fix -
The fix is to reset the GPS using the MODE & POWER keys as described in the secret
keys section above. Unfortunately this will remove all waypoints & events from memory.
![]() The Work
Around - The problem only occurs when manually entering a new waypoint and you
enter the position before you enter the name. So if you enter the name 1st the bug does
not occur.
The Work
Around - The problem only occurs when manually entering a new waypoint and you
enter the position before you enter the name. So if you enter the name 1st the bug does
not occur.
I have also had this bug occur when sending waypoints (with a blank name) to the GPS
from software. My software has now been designed so no blank names can ever be sent.