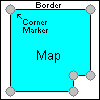
When finished the effect could be something like this.

Corner Markers
(Corner markers are adjusted in map calibration)
Many maps have a border around the actual map (called the neat line). OziExplorer can make use of the neat line to change maps when you cross this boundary when using moving map real time tracking mode. So the software can detect where the actual map boundaries are you must position the corner markers on the map corners.
The corner markers will default to the corners of the image, if your map has no borders (neat line) there is no need to move the corner markers.
Display Corner Markers
Use the Map Border Control to display the corner markers and manage the points which form the border around the map.
