Calibrating a Map
The Demo map has already been calibrated but we will show you how it was done.
Because we are starting with a map which has already been calibrated we open it by selecting the Check Calibration of Map option on the File Menu. If however you were starting with just the map image and are creating a NEW calibration you would select the Load and Calibrate Map Image option on the File Menu.
Before specifying the calibration points for a map there are fields which must be entered or selected.
Note: The datum for the Shareware/Demo version of OziExplorer is set as WGS 84 and cannot be altered.
Note: The Map Projection for the Shareware/Demo version of OziExplorer is set as Latitude/Longitude and cannot be altered.
Specifying the Calibration Points
In order to calibrate a Map you need to know the accurate coordinates of 2 or more points on the map. Just using 2 points is not recommended but is the only choice for the Shareware/Demo version. The demonstration map has been calibrated using 2 points so it can be used with the shareware version but you should always try to have at least 3 points for an accurate calibration.
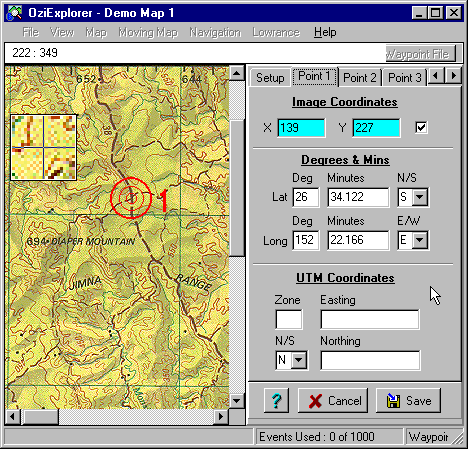
Click on the tab labeled Point 1 - you will see the X and Y fields have numbers in them, these are the screen coordinates of a point on the map image. The Lat and Long (Latitude and Longitude) fields in the Degs & Mins section also have values in them, these are the geographic coordinates in the selected map datum which correspond to the X,Y point on the map.
How do we get those values in these fields - If you move the mouse pointer onto the map image you will see the cursor changes to x-hairs with the number 1 displayed. You move the pointer onto the first point you have selected as a calibration point (you may have to scroll the map to find it) and click the mouse button, the x,y coordinates of the point are transferred to the X,Y entry fields. It is ok to do this with the demonstration map, we will not save the changes (try it). When you have the X,Y points entered you then enter the Lat, Long coordinates which match that point, the lat,Long coordinates can be entered in different formats such as Deg,Min and Secs (see Special Keys and Stuff topic in Hints, Tips and FAQ section of Help). You can also enter in Grid coordinates based on the Grid System you are using, this depends on the choice you made for the Map Projection above. You can enter either Lat,Long or Grid values but not both (for the same point).
The same method applies for the other calibration points. For this map we have only used 2 points to derive the calibration but 3 or more points is preferred.
What you are doing here is tying the map image X,Y coordinates to the actual geographic Lat,Long or Grid coordinates. OziExplorer is then able to calculate a mathematical equation to allow positions to be converted from map x,y points to geographic coordinates and of course the inverse as well.
This is a screen shot of the demonstration map showing calibration point 1. In this case I have chosen an intersection as my first calibration point, I can do this because I know the precise Lat, Long coordinates for the position. This map has grid lines so I could have chosen the intersection of 2 grid lines, this would have given me the exact position as well, in fact in normal circumstances this would normally be the preferred way of doing it. I could also have used UTM Coordinates (or your selected grid) to specify the position instead of Degrees and Minutes.
To calibrate additional points you select the Point 2, Point 3 etc tabs, use the arrow keys on the right hand side of the tabs to scroll more tabs into view.
The calibration of maps is discussed fully in the Creating Maps topic in the Help.
(DO NOT do this now ) When you have entered all the calibration points you then press the Save Button to save the calibration as a .map file. You will be asked for a name to call this file, use a long meaningful name as this is the name you will use in future to select maps for loading.
For this tutorial you need to press the Cancel Button so any changes you have made will not be saved. Press the Cancel Button now to leave calibration mode.
Click here for the Other useful features Tutorial