Working with Tracks and the Track Control
Lets load in a Track from file
(Note: A track is sometimes known as a Plot Trail but within OziExplorer they
are always called tracks.)
- Press the Load Button on the Tool Bar.
- Select the Load Track from File option on the menu.
- Select the "demo1.plt" file from the file open dialog.
(Tip: to load many tracks, hold down the "Ctrl" or "Shift" keys while you
select the tracks to load.)
The track will be displayed on the map. This track was collected on one of my 4x4 trips using the GPS, it was downloaded
from the GPS using OziExplorer and saved to the "demo1.plt" file.
Now press the Track Control Button
 on the Tool Bar, the
Track Control will be displayed.
on the Tool Bar, the
Track Control will be displayed.

You will notice there is a row of buttons on the Tool Bar of the Track Control.
The
 button determines if the tracks (all of them) are displayed on the map. Press the button in and
out and you will notice the track disappear and reappear. Make sure you leave the button
pressed so the track is displayed.
button determines if the tracks (all of them) are displayed on the map. Press the button in and
out and you will notice the track disappear and reappear. Make sure you leave the button
pressed so the track is displayed.
The color and width of the track can be configured by using the Track
Properties dialog.
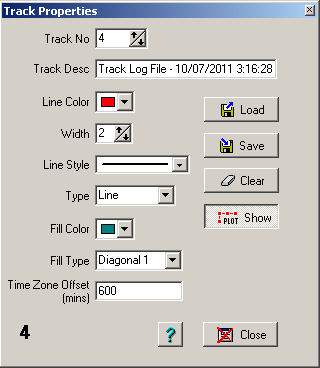
- Press the button
 on the
Tool Bar (alternatively, double click on Track 1).
on the
Tool Bar (alternatively, double click on Track 1).
- The Track Properties window will be displayed.
- Press the triangle adjacent to the Line Color and select a different color.
- Press the up arrow adjacent to the Width to increase the line width.
- (DO NOT do this now) The Save Button
is used to save the changes.
- Press the Close Button to close the Track Properties
window.
Lets try loading another track into Track 2.
- Select Track 2 with your
mouse to highlight it.
- Press the button
on the
Track Control Tool Bar (alternatively, double click on Track 1).
- The Track Properties window will be displayed and the track description
will show "Track not loaded ..."
- Press the Load Button
 and select the
file "Demo2.plt", the track file will be loaded.
and select the
file "Demo2.plt", the track file will be loaded.
- Press the Close Button to close the Track Properties
window.
Lets view the list of track points for Track 2.
- Press the button
 on the Track Control Tool Bar.
- The Track List window will be displayed showing the list of track points.
- The data for each track point (such as the coordinates) is listed, some
parameters are calculated. For example, if the Date and Time have been
collected with the track then the speed for each section between track points
is calculated.
- Track 2 is not on the map that is loaded (Demo1.map) so you can see the
Map column has "No" for each track point indicating the points are not on the
map.
- The Tool Bar on the top of the Track List allows you to work with or on
the data.
Creating or Editing a Track
While it is possible to add new track points to an existing track, for this tutorial we will start without a track loaded.
- On the Map Menu select the Clear All Tracks from Map
option.
- Click
the Yes button when asked to Clear the Track Points. This will make
sure there are no track points in memory.
- Open the Track Control by clicking on the Track Control
Button on the Main Tool Bar.
- Select the Create Track Points or Insert Track Point Button
 on the Tool Bar. The mouse pointer will change to cross hairs with the word Track. In this mode
where ever you click on the map a track point will be created. The insert
button will insert the track point between the 2 closest track points
and the create button will add the point to the end of the track.
on the Tool Bar. The mouse pointer will change to cross hairs with the word Track. In this mode
where ever you click on the map a track point will be created. The insert
button will insert the track point between the 2 closest track points
and the create button will add the point to the end of the track.
- Click anywhere on the map and create a track with about 10 points. You will see the
number of Points and the Distance increasing in the Track Control window as you add new
points. The track points are added to the track number selected in the Track
Control List. Notice also that the track has a color and line width, these are the
defaults and can be set in the main configuration.
- Click the Open Selection Control button
 to show the
Selection Control. The Selection Control is used for selecting track points
(and also for other objects such as waypoints, points etc as described in the
Selection Control section of the help). On the
Selection Control, click the button Draw Box to Select Track Points
to show the
Selection Control. The Selection Control is used for selecting track points
(and also for other objects such as waypoints, points etc as described in the
Selection Control section of the help). On the
Selection Control, click the button Draw Box to Select Track Points
 (4th from left)
to activate the tracks. Using
the mouse, hold the left mouse button down and drag across the map selecting
several track points. You will see the track points that fall within the
box change size and color to indicate they have been selected. Now, on the
Selection Control, click the Delete Selected Objects Button
(4th from left)
to activate the tracks. Using
the mouse, hold the left mouse button down and drag across the map selecting
several track points. You will see the track points that fall within the
box change size and color to indicate they have been selected. Now, on the
Selection Control, click the Delete Selected Objects Button
 and confirm the
deletion, the selected track points will be deleted.
and confirm the
deletion, the selected track points will be deleted.
 The Enable Mouse
on Track Points button makes the track points active
- a hint will be shown when the mouse is on the track point, allows the track point to
be dragged, right click on a track point will display a Menu of options.
The menu options allow you to delete a track point and do other operations.
The Enable Mouse
on Track Points button makes the track points active
- a hint will be shown when the mouse is on the track point, allows the track point to
be dragged, right click on a track point will display a Menu of options.
The menu options allow you to delete a track point and do other operations.
This newly created track can be saved to a file, uploaded to the GPS (where applicable)
or permanently attached to a map.