Working with Routes
(The Route Creation toolbar and Route Navigation toolbar will assist in working with routes).
Navigation using simple "GoTo"
There are several locations to select the GoTo option. Selecting the GoTo option creates a simple navigation to a chosen waypoint. A yellow line is drawn from the current moving map position to the chosen waypoint. Following the direction of the yellow line will help navigate to the waypoint position (destination).
The GoTo option is available in the Waypoint List, Name Search and the waypoint popup menu.
Example : (using the Waypoint popup menu) - Move the map to your destination. Press and hold the stylus at your destination position until the Map popup menu appears. Select "Create Wp" from the menu. Press and hold on a waypoint until the waypoint popup menu shows. Select the "GoTo Wp" option from the menu. To cancel navigation, select the "Cancel Nav" on the Map / Navigation menu or from the Route Navigation toolbar.
Turn on moving map by pressing the start
communication with the GPS button![]() on the Program Menubar.
on the Program Menubar.
Navigation with auto-prompting
OziExplorerCE has the ability to do auto-prompting as you navigate along a route.
Please note this feature is completely separate from the proximity setting and file attachments used in normal waypoints.
How auto-prompting works
Depending on your setting in the Configuration/Moving Map option, this section explains the operation of the various modes.
Land Mode (set in Configuration/Moving Map).
As you navigate along a route and enter the route waypoint proximity the angle between a line connecting "your current position and the waypoint" and a line from the "waypoint to the next waypoint" is calculated, this determines the turn direction and the angle. The angle determines the type of turn :
- straight on
- veer
- hard veer
- turn
- sharp turn.
It is important to consider the placement of waypoints carefully, in order to make sure you receive a reasonable direction prompt. This can mean adding additional waypoints in the route to make sure turn angles are correct. A special type of route waypoint with a silent property can be created. Silent waypoints take no part in the navigation, they are used to aid in calculating the turn angle, they are typically placed just after a waypoint on a turn if the next waypoint would result in the turn angle being calculated incorrectly. The use of silent waypoints is optional, they are not required on every turn. Silent waypoints are displayed on the map as small circles without a cross through them.
Tip : When creating a route you may find it helpful to work from your destination backwards to your departure point.
It is also useful to place waypoints on major intersections even if proceeding straight through, the prompt will tell you to go "straight on". The placement of waypoints on large bends in a road are also useful.
Note : it is not possible for the software to determine if the calculated angle is for an actual turn at an intersection or a bend in the road.
Marine and Air Mode (set in Configuration/Moving Map).
As you navigate along a route and you enter the route proximity zone of a waypoint or pass the waypoint it is assumed that the leg of the route is finished. Navigation to the next waypoint is started. The bearing from your current position to the next waypoint is calculated and displayed. If voice prompting is in use then the voice will say the heading to steer.
Direction Arrow Window

This is mainly for Marine and Air mode but can be displayed for Land mode as well.
To show/hide the Direction Arrow Window, press the button
![]() on the
Navigation toolbar.
on the
Navigation toolbar.
The Direction Arrow Window shows an orange shaded segment which is the angle between your course over ground and the bearing you should steer to head towards your next waypoint. The mark in the centre / top of the window represents your next waypoint (your destination) and the arrow represents your course over ground relative to the destination. If you steer towards the mark you are heading towards your destination.
Sound Files
The names of all the sound files used internally in OziExplorerCE start with "ozi_", if you want to change the words or the language then there is a help section on the main OziExplorerCE help menu available on the OziExplorerCE web site which describes the process.
Symbol Files
These are just BMP files. The names of all the symbol files used internally in OziExplorerCE start with "ozi_". You can replace any symbol with one of your own by giving your symbol the same name. Keep the image size roughly the same (not much larger) so the screen is not covered.
Loading a Route

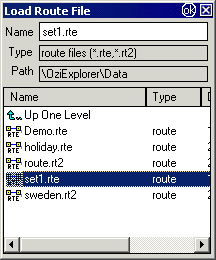
Load a route from a route file that has been created in several ways;
The OziExplorerCE (.rt2) file only contains one route and is the default route type for OziExplorerCE.
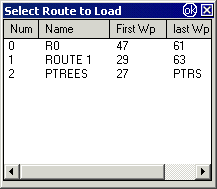
The route (.rte) file can have more than 1 route stored within it, when loaded a dialog will be displayed so the required route can be selected. Highlight the route and click OK.

Saving a Route

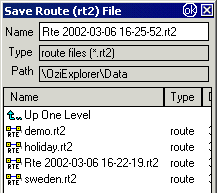
Save a route that has been created or modified (i.e. the route currently displayed), the file extension will be (.rt2). The Save File dialog allows you to select a path and filename. A default filename based on date and time is displayed or enter your own.
Note : A route loaded from a route file (.rte) with multiple routes will be saved as a (.rt2) file.
Using the Toolbar
![]()
If the Add or Insert Waypoint buttons are active they will have the appearance of being depressed.

A prompt is displayed to indicate the option selected.
Some operations will display a dialog with confirmation options - Yes/No.
Creating a Route (overview)
Adding a Route Waypoint (route leg)
Hint: Zooming out can assist in creating your next waypoint. If your next position is off the map screen, drag the map into position using the stylus, this can be done while "Adding a Route Waypoint" is active provided it is done in a smooth motion.
Inserting a Route Waypoint
Deleting a Route Waypoint
Deleting a Route from the map
Route Properties
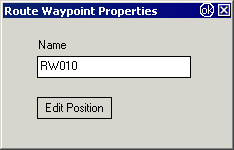
Editing a Route Waypoint

Name - Enter a name for the waypoint, names can be any length up to 250 characters but for ease of use do not make them overly long.
Edit Position - Allows the position of the waypoint to be edited. See the Edit Position help for more details.
Navigating along a Route