|
Moving map navigation using
any GPS providing NMEA output in one of the supported sentences. |
| |
|
OziExplorerCE will allow you to create your own
routes on the map and navigate along those routes.
The design philosophy is you plan your trip
using the full PC OziExplorer on you PC and then transfer your
waypoints and other data to your PDA for use by OziExplorerCE.
Maps
Works with maps world wide, obtain digital maps
for your region of interest in one of the many supported image
formats or if you scan your own, you can use PC OziExplorer to
calibrate them for use in OziExplorerCE.
OziExplorerCE uses a special image format which
provides faster loading and better zooms, an image conversion
utility is provided with OziExplorerCE. Maps in ECW format
can also be used without conversion.
Maps in BSB4, BSB5 and Kompass
format can be converted for use in OziExplorerCE.
GPS
For real time navigation almost any GPS receiver
with NMEA 0183 output (most output the required GPRMC or GGA or
GLL sentence). These include built-in GPS or an external GPS connected to the CE
Device serial port, a compact flash GPS plugged into a compact
flash slot, a SDIO GPS, a Bluetooth GPS or a Navman GPS sleeve (for iPaqs).
Waypoints and Tracks
Sets of waypoints (up to 10,000 waypoints) can be loaded from waypoint
files (also supports .ov2, .loc and .gpx formats).
Waypoints and tracks can be automatically logged to file
storage. Configurable Options -Multi Screen
Support - Page through the screens on your PDA / PND
Using our "Screen Designer" software on your PC, design your own
screens (up to 20 screens) with the parameters you want. Select
from a list of more than 100 parameters and buttons.
Click here to see the
comprehensive list of more
than 100 parameters and buttons which can be added to screens.
Screen designs to suit many
applications, moving map, navigation, geocaching, satellite,
compass, altitude and track profiles etc.
These comprehensive configuration options
allow you to set up OziExplorerCE to work and feel the way you like it.
Screen Designer for OziExplorerCE
Ability to program the hardware buttons (Pocket PC's only).
Support for PDA's with high resolution VGA displays.
The log book feature is fully configurable to
automatically make log book entries when the configured
conditions are met. |
|
|
|
| |
|
|
|
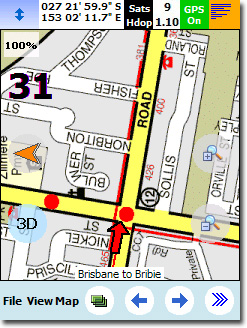
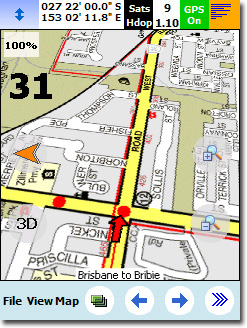
3D Perspective or standard
view at the click of a button. |
| |
3D Perspective view rotates the top of the map down using a true
perspective view and provides for more map view ahead when tracking
the GPS position.
 |
 |
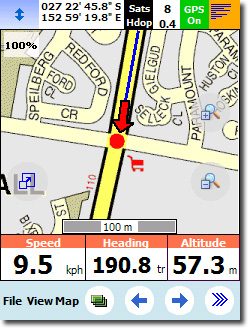
Here is a brief explanation of some aspects the
PDA screen shown on the left.
|
 |
click the button to hide the bottom toolbar
and show more of the map. |
|
 |
shows the GPS status (On/Off) and background
green shows a fix has been obtained. |
|
 |
a small graphic representation of the
satellite signal strengths. |
|
31 |
the current speed in the units you choose (kph,
knots etc). |
|
 |
the north arrow points to North. Particularly
useful in "course up" mode where the map is rotated
to the direction of travel. |
|
3D |
click the 3D button to toggle on / off 3D Mode
to show more look ahead. |
|
 |
click to change to the next page (up to 20
pages which can contain the map, parameters and buttons) See
more screenshots here |
Also see the On Screen Display of Parameters
section below. |
|
Standard View |
3D Perspective View |
|
|
| |
|
|
|
Automatic loading of the next
map and check for more detailed map at a set interval. |
| |
A new map will be searched for when you leave the current map. The
most detailed map will be selected. If activated in configuration a
more detailed map will be searched for at a user defined interval even
if you are still on the current map.
|
| |
|
|
|
Automatic Route prompting
(voice and symbol). |
| |
This is not auto-routing, you must define the route
manually using the Route Create toolbar.
-
With auto-prompting, OziExplorerCE will
automatically tell you to turn right and left and so on as each
route waypoint is approached.
-
OziExplorerCE works out the turn angle and direction
itself and selects the appropriate symbol (.bmp) and sound
file to play (.wav).
-
The symbol is automatically displayed (when in "Land" mode)
and the wav file is automatically played.
-
The distance from the approaching route waypoint
(when in "Land" mode) or the Course to Steer to the next waypoint (when
in "Marine" or
"Air" mode) is also played using voice prompts.
|
| |
|
|
|
Types of Map Objects
recognised by OziExplorerCE |
| |
Waypoints, Routes and Tracks can be created directly on the screen
using the stylus. Map Comments and Map Features which have been
created in PC OziExplorer and saved with the map can be displayed.
|
| |
|
Waypoints |
|
Routes |
|
Tracks |
|
Map Comments |
|
Map Features |
 |
|
 |
|
 |
|
 |
|
 |
|
| |
|
|
|
Various Toolbars for easy
operation |
| |
 |
Several toolbars are available to be turned on to assist to make
operations easy for the user. There is a main toolbar with many
frequently used functions, as well as specific toolbars for Waypoints,
Tracks, Route Create and Route Navigation. The toolbars can be easily
hidden by pressing on the X button on the toolbar.
 |
 |
|
|
The Route Create toolbar. |
Screen prompts are shown where necessary
during
toolbar operations. |
|
|
| |
|
|
|
Create a Route on screen.
|
| |
Plan your desired path and use a special route create toolbar to
easily create a route by adding, inserting or removing route
waypoints, edit properties. Simply activate the add button on
the toolbar and click on the map at the desired positions to add a
route waypoint. You can also move a route waypoint forward or
backwards in the route. Waypoints can be dragged on the map using the
stylus.
During navigation, voice and
symbol prompts are activated. If you give a waypoints a silent property, no
prompts are activated when approaching it, useful for setting up turn
angles but the silent waypoint is not used for navigation.
Routes can be saved to files and reloaded. |
| |
|
|
|
Tracks can be created on the
map using the stylus - 5 user tracks can be created or loaded from a
file |
| |
Up to 5 Tracks can be created in OziExplorerCE or tracks from the full
PC OziExplorer can be loaded. Tracks created in OziExplorerCE can be
loaded by PC OziExplorer. Each track has its own properties of color
and track width in pixels.
|
| |
|
Points on the
Active track are shown with white dots |
-
The Track Toolbar is used to easily create
user tracks, any of the five tracks can be made active and can be
easily manipulated on the screen.
-
All tracks can be modified and saved, track points
can be added or inserted by clicking at the map position when either
the add or insert Track Toolbar button is activated.
-
Track points can be dragged to a new position on the
screen.
-
Press on an active track point to display the
coordinates of the track point position.
-
A popup menu can be activated by a simple press and
hold on an active track point for 1 second. The menu has
options such as Create Waypoint at track point and split / join
track section.
-
A Track List shows information about each track of
the 5 tracks including total track distance.
|
|
| |
|
|
|
Logging of Track points to file
and display of track on screen |
| |
When in moving map mode (real time tracking), Track Logging can be
turned on so the track can be automatically logged to a file and can
be configured for a new file to be created at intervals such as daily,
weekly etc. The
recent track history is also displayed on the map as a track
tail (up to 1000 points are kept in memory).
-
Use the track tail to view the recent track history.
-
The track tail can be saved to a file for permanent
storage.
-
Ability to split the track logging daily, weekly,
monthly or continuous to one file.
-
Saved files can be reloaded into one of 5 available
tracks and displayed on the map.
-
Tracks created in OziExplorer for PC's can be loaded
into OziExplorerCE.
|
| |
|
|
|
Replay of stored tracks
|
| |
OziExplorerCE has a "Replay Track" option. For example if you have
saved one of the tracks collected during a trip, you can load the
track and replay (travel) along the track. The track will be replayed
using the same configuration settings used for normal moving map
operations.
The CE track replay option can also be used track files
produced by PC OziExplorer. |
| |
|
|
|
Load and display Waypoints on the map
or create a Waypoint at current position or any other position using
the stylus. |
| |
There are several ways to display waypoints on a map.
-
Load waypoints from a saved file
-
Using the Waypoint toolbar, add waypoints by
tapping on the map with the stylus at any position
-
Load waypoint files saved by PC OziExplorer
-
A "Screen Control" feature can be used to quickly
add a waypoint at the current position, just press on the centre of
the screen.
Other features of waypoints -
-
The name and description of a waypoint can be
edited. To view information about a waypoint, press and hold on the
waypoint, the waypoint name, date and time and latitude and
longitude will pop up on the screen.
-
Waypoint names can be displayed adjacent to the
waypoint.
-
Waypoint can be dragged to a new position using the
"drag" feature.
-
Waypoint files created by OziExplorerCE can be
loaded by PC OziExplorer.
-
Press and hold on a waypoint for a popup menu to
Edit, Delete, GoTo (turn on navigation to the waypoint) or add the
waypoint to a route.
-
Auto logging option can be activated so any
waypoints added can be automatically logged (saved) to a file.
|
| |
|
|
|
Drag Map Objects to new position
|
| |
Waypoints, route waypoints and active track points can be moved to a
new position when the Drag Objects button on the main toolbar is
active (pressed). Simply press on the object with the stylus and
drag it to the new position.
|
| |
|
|
|
Hold stylus on Map Objects to get information about them
or to get a popup menu of options |
| |
|
Waypoint
Popup Menu |
Popup Information - Press and hold the stylus on the map or
any map object (waypoint, route waypoint or active track point)
until a red circle appears (approximately 0.5 seconds), release
the stylus to show a window with information about the map or
map object.
Popup Menu - Press and hold the stylus on
the map or any map object (waypoint, route waypoint or active
track point) for at least 1 second to show a popup menu with
several menu options. The map popup menu has zoom selections,
Full Map or 100% Zoom. Map Object popup menus are different for
each object type.
|
|
| |
|
| |
|
|
|
Many Map Zoom levels |
| |
 |
Zoom buttons can be added to any screen, the map can be zoomed by clicking on the magnifying glass buttons or selecting a zoom option on the view menu.
Zoom up and down can also be added to the PDA buttons on a Pocket PC. Configure the
zoom levels above 40% that you require in Configuration. Zoom levels
below 40% are always available.
The zoom full option will select a zoom level so the
complete map just
roughly fills the screen.
A 100% zoom level is also available so you can quickly
return to normal zoom.
|
|
| |
|
|
|
Scale on Map |
| |
Display a scale on the map, the scale automatically adjusts when the
map is zoomed in or out.
 |
| |
|
|
|
Various Position display formats
|
| |
Selectable position display formats such as Degrees and Minutes,
Degrees Minutes Seconds, and grids such as UTM, BNG and many more.
Current position is shown in the selected format.
|
| |
|
|
|
On screen display of
parameters
|
| |
Standard screens are provided or select from more than 100 parameters
such as Speed, Heading, Altitude and many more. Use the screen
designer to change the "look and feel" of the screens by selecting the
parameters to display and also many additional properties such as font
size, color, transparent, translucent etc.
For example, during moving map operation the speed,
bearing and altitude can be displayed. Using the screen designer,
parameters can be added or removed from the screen or additional
screens can be designed.
Parameters can also be added / removed from screens.
Select from a list of more
than 100 parameters and buttons.


|
 |
|
|
Some examples of various parameter displays. Use
the screen designer to change a parameter or the size, color, look
(transparent / translucent) etc. |
The Compass parameter can be sized to suit. (up to full screen
size) using the screen designer. |
|
|
| |
|
|
|
Speed Monitor (plays sounds (wav files) when set speeds exceeded).
|
| |
If selected, the speed monitor will play wav files when the speed
thresholds are crossed. If the wav files are not found the standard
beeps are used.
-
Min Speed - played when the speed goes below the
specified minimum speed.
-
Set Speed - played when your speed goes above the
specified set speed.
-
Max Speed - played when your speed goes above the
specified max speed.
The three speeds can be activated independently of
each other. |
| |
|
|
|
Find Maps at cursor position
|
| |
Map search routines are built-in, simply press the "Find Map at
Cursor" option and OziExplorerCE will scan the
folder where the current Map was
loaded from and configurable Map File Paths and find all the
maps which will have the current cursor position contained within
them.
During real time tracking, these paths are
automatically searched for maps. |
| |
|
|
|
Uses and writes files in the same formats as the full PC based OziExplorer
|
| |
Data files are in the same format so files saved in OziExplorerCE can
be loaded into the PC based OziExplorer.
|
| |
|
|
|
|
Name Search |
Satellite View
and NMEA Data |
| |
|
|
The PC OziExplorer and OziExplorerCE name search
databases are identical and databases created for PC OziExplorer
can be used. A utility is provided so you can
make your own databases for most countries from data which is
available from the internet. |
|
One of the screens available is the Satellite
View. If your GPS is connected and outputs the GSV
NMEA sentences, a graphical display will show the satellites
your GPS has connected with.
To assist you to check the NMEA output from the GPS, another
parameter is
provided to view the NMEA sentences being received from the GPS. |
 |
 |
|
| |
|
|
|
Map View |
| |
Map View is a small window on top of the main map window which
displays the full map. Features of the Map View are -
-
The Map View can be turned on/off from the View Menu
or by pressing the Map
View button on the Main Toolbar.
-
Clicking on the Map View map will scroll the main
map to the same position.
-
Click on the colored border around the map to
display a list of the available maps at that position.
-
The Map View window can be resized to suit your
requirements.
-
Waypoints, Map Features and Map Comments can be
displayed on the Map View window.
Small map view window showing the full map which can overlay the main map
window. |
| |
|
|
|
Nearest Waypoint List |
| |
When navigating, the nearest Waypoint List shows the waypoints that
you are getting closer to in green and the waypoints you are going
away from in white. The waypoint being navigated to is highlighted
red.
 |
| |
|
|
|
Screen Control |
| |
|
A special feature available in OziExplorerCE is "Screen
Control".
So it is easier for the operator to control the
software in a tricky environment the screen itself (the map
area) has been divided into a grid of 9 zones on 1 or more pages, each
zone acts as a button which can be pressed by the finger for
instant action.
The top left button will show / hide the overlay
shown in the picture to help you see the zones and the
operations they perform.
For example : if you want to place a waypoint on
the map at the current position, simply press the centre of the
screen. |
 |
|
| |
|
|
|
Log Book
|
| |
A fully configurable logbook function can automatically log position,
date/time, and other parameters when the configured conditions such as
elapsed time, distance, heading and speed change are met. A snapshot
of a small portion of the map can also be taken and added to the log
entry. Manual Log Book entries can be made.
|
| |
|
|
Note : OziExplorer cannot upload maps to any
mapping GPS. These require special maps and software which is
usually only provided by the GPS manufacturer. |